何も考えずに作業を始めてしまった時のGitコマンドメモ
よくある話なので忘れないようにメモです。
subl .gitignore
sublimeをインストールしてる前提ですごめんなさい。
作業内容にもよるんですが、何も考えずに下記コピペ保存でいい気がしてます。
ちなみに.DS_Storeとかはmacの話です。
.DS_Store
.ipynb_checkpoints
*.pdb
*.cif
*.csv
*.sdf
*.xml
*.json
*.smi
*.xlsx
githubにrepositoryを作成してurlをコピーしておく
ここにgitを紐づけます。
README.mdファイルは作るとエラーの元になるかもなんで作らないほうがいいです。
git init --shared
pushしたいdirectory内でコマンド打つと.git fileを作成して目印を付けます。
git add .
とりあえず全部Staging areaに突っ込みます
git commit -m ' repository created'
repository作ったよとコメントしてcommit します。
git remote add origin url
コピーしておいたgithub上のrepositoryのURLを指定します。
git remote -v
ちゃんとremote repositoryを指定できてるか一応確認します。
git remote rm origin
remote repositoryが間違ってたら一旦削除してもう一度git remote add します。
git push -u origin main
remote repositoryにpushされるはず。
次はブランチ切らずに作業を始めてしまった時の流れをまとめたいです。以上。
count_atomコマンドで特定のアミノ酸の数を数える
Grüezi,
タンパクの結晶構造を見てる時に,ふと特定のアミノ酸が何処にあるかとか,それが全部で何個あるか気になることってありますよね.
例えばLysineが何個あるか数えたい時は,PyMOL上のコマンドラインで,こう唱えます.
count_atom resn lys and chain A and backbone and elem n
count_atom (selection)でselectionの原子数を数えられます.
これを利用して,LysineかつChain Aかつ主鎖かつN原子の数を数えればタンパクに含まれるLysineの数を数えられるはずです.
コマンドを打つのが面倒なので,見たくなりそうなアミノ酸だけalias化して.pymolrcに追加しておきましょう.
alias k, hide sticks, polymer.protein; show sticks, resn lys; count_atom resn lys and chain A and backbone and elem n
alias c, hide sticks, polymer.protein; show sticks, resn cys; count_atom resn cys and chain A and backbone and elem n
alias s, hide sticks, polymer.protein; show sticks, resn ser; count_atom resn ser and chain A and backbone and elem n
alias h, hide sticks, polymer.protein; show sticks, resn his; count_atom resn his and chain A and backbone and elem n
alias t, hide sticks, polymer.protein; show sticks, resn thr; count_atom resn thr and chain A and backbone and elem n
alias r, hide sticks, polymer.protein; show sticks, resn arg; count_atom resn arg and chain A and backbone and elem n
alias d, hide sticks, polymer.protein; show sticks, resn asp; count_atom resn asp and chain A and backbone and elem n
alias e, hide sticks, polymer.protein; show sticks, resn glu; count_atom resn glu and chain A and backbone and elem n
alias y, hide sticks, polymer.protein; show sticks, resn tyr; count_atom resn tyr and chain A and backbone and elem n
これで次からはkをコマンドライン上で叩くだけで,lysineの数が表示されるだけでなく,Lysineのstickを表示してくれます.
タンパクのどの辺にそのアミノ酸があるかが簡単に見つかるわけです. これは結構便利だなー.
as nb_spheres, solvent で水分子をなんとかする
Grüezi,
過去のエントリでPyMOL上に表示される溶媒の水分子をなんとかする試みを紹介しました.
今回はasコマンドで水分子をうまく扱う方法とともに,.pymolrcを少し書き換えたので,以下紹介です.
cd ~/Documents/PDB
set cartoon_transparency, 0.5
set transparency, 0.6
set surface_color, white
set sphere_scale, 0.4
set label_color, gray

alias al, alignto; zoom
alias sp, split_chains enabled; alignto; zoom
alias cc, util.color_chains("(enabled and name CA)",_self=cmd)

alias see, zoom byres organic around 8 and chain A
alias del, as nb_spheres, solvent
alias sol, as nb_spheres, solvent; hide nb_spheres
alias line, show lines, byres organic and enabled around 4
alias hb, select ligand, organic and enabled; cmd.dist("contact","(ligand)","(byobj (ligand)) and (not (ligand))",quiet=1,mode=2,label=0,reset=1); cmd.enable("contact")


alias well, show surface, byres organic and enabled expand 5
alias 5, create a5, byres organic  and enabled expand 5; disable !a5; see
alias 4, create a4, byres organic  and enabled expand 4; disable !a4; see

alias tag, label byres organic and enabled around 5 and name ca, "%s%s" % (resn, resi)
alias untag, hide label

alias pick, cmd.mouse('forward')
alias ch, capture; save image.png
実際の操作をちょっと見ましょう.
下記のコマンドでPyMOLにPDBを読み込みます.
fetch 7BV2
ご存知Remdesivirの複合体です.  今まさにRNAに取り込まれようとしていく様が結晶として取れるなんてスゴイですね!
さて,右側に見える赤とオレンジのspheresが作っている四面体はリン酸で,黄緑のspheresがMgイオンです.
今回はめっちゃ水分子が少なくていい例じゃないですね笑.
さて,次のコマンドを打ってみると,リン酸の右側にちょこちょこっとだけ表示されていた水分子が,赤い小さなspheresになります.
as nb_spheres, solvent
 実際には
実際にはas nbまで打ってtabキーで_spheres,まで補完してくれます.そう,soの後にtabキーでsolventも補完されます.
asコマンドは
as representation, selection
の形で,selectionを好きな表示方法(representation)に指定できます.selectionを指定しない場合はdefaultがallで全指定です.今回は,溶媒をnb_spheresの表示に指定したわけです.
nb_spheresは普通のspheresと区別して使用することができます.
何が便利かというと,今回でいうリン酸やMgイオンのような無機物と分けて指定できるんですね.
これを踏まえて,solやdelのaliasコマンドでアクティブなオブジェクト上の水分子を出したり消したりできます.
seeやline,hbのaliasコマンドと組み合わせて, PDBを読み込んで最短4コマンドでこちらのような絵が作れます.

というわけで,本日の自己満でした.
必ず忘れるGit Command メモ
Grüezi,
使いたい時には忘れてるGit commandをメモ代わりにalias化しました.
~/.gitconfigに下記コードを保存すると,terminalでgit [alias]でgit コマンドとして使えます.
大体これで作業順な気がする.
[alias]
    rv = remote -v
    ra = remote add origin # for setting remote repo, paste remote URL
    br = branch #show branch
    cb = checkout -b #create and switch branch
    c = checkout #switch branch
    s = status
    d = diff #show diff between main and current branch
    dd = diff --name-only #show diff between main and current branch as file name
    l = log --oneline
    ad = add .
    com = commit -m # with "commit comment"
    cm = checkout main # switch to main branch
    m = merge # merge branch into current branch
    bd = branch -d #delete branch
cloneとかpullした後のbranchがmasterではなくmainになってるので注意.
このaliasでgit commit -mは,
git com 'comment etc.'
みたいにquate使った方が,スペース使ってもerrorが出ない.
これらのaliasはtabで補完されないので注意.
忘れた時はそれっぽくわざと間違うと,
git: 'co' is not a git command. See 'git --help'.

The most similar commands are
    commit
    com
みたいに教えてくれる.
git --helpではaliasまで表示しないけど,git help -aだと一応一番下には表示される.けど,見つけづらいので非推奨.
cat ~/.gitconfig
こちらはcat ~/.gitまで覚えておけばtabで補完もしてもらえるし,terminal上でalias一覧を確認出来るので便利かも.
.zshrc周りをいじるのに抵抗がなければ,
alias b='git branch'
alias rv='git remote -v'
alias ra='git remote add origin' # for setting remote repo, paste remote URL
alias b='git branch' #show branch
alias cb='git checkout -b' #create and switch branch
alias c='git checkout' #switch branch
alias s='git status'
alias d='git diff' #show diff between main and current branch
alias ddd='git diff --name-only' #show diff between main and current branch as file name
alias l='git log --oneline'
alias ad='git add .'
alias com='git commit -m' # with "commit comment"
alias cm='git checkout main' #
alias m='git merge' # merge branch into current branch
alias bd='git branch -d' #delete branch
を追記すると,gitすら入力する必要がなくなる.(動作保証はしませんが)
.gitignore
Git管理下のparent directoryに置いておく隠しテキストファイル. Git管理対象外のFile名を指定出来る.
*.sdf
*.smi
*.cif
*.pdb
*.pse
.ipynb_checkpoints
chemoinfoクラスタは辺りはdefaultでGit管理から外しておかないと大変になりそう.
git diff周りがちゃんと理解出来てないので,そのうち追記していきます.
JupyterNotebookのショートカットメモ
いつも忘れてしまうやつの抜粋.
jupyterとかMacOSのversionが違うと微妙に違うので注意.
MacOS Big Sur, M1
Python 3.7.9 (conda 4.9.2)
- Cellを分割 ctr + Shift + -
- Cellを統合 Shift + M
- Kernelを中断 i, i
- 単語単位でアクション option + key
- 行単位でアクション command + key
- サイドバーの表示切り替え command + b
- üやÅなんかはキーを長押し
Cellを分割 ctr + Shift + -
分割したい末尾でCtr + Shift + -
実行はされない.
Cellを統合 Shift + M
Cellを選択してShift + Mで次のCellと統合.
Cellを複数選択すると,全て統合
Kernelを中断 i, i
実行時間が長い時に中断.
error表示になるので非おすすめ.
単語単位でアクション option + key
print(root.find("a").attrib)
みたいなコードの時は,単語単位or記号をまとめて").の形でsクション出来る.
⌥押しながら左右で移動,⌫で削除,みたいな感じ.
今気づいたけど,これ他のtext editorでも使えるね.Markdownも同じ動き.
行単位でアクション command + key
⌥(option)で単語単位,⌘(command)で行単位と覚える. これもjupyter以外にもはてブとかのMarddownでも使えました.
サイドバーの表示切り替え command + b
マウスを使わずに出来るとちょっと便利.
üやÅなんかはキーを長押し
最近のMacOSやiOSの特権だと思うけど,キーを長押しすると該当する特殊記号が候補表示されます.
顔文字にも使えるね(ü)
どうでもいいことなんだけど,はShift + option + kで入力出来るのに⌘(command)とか⌥(option)にショートカットがないのはなんでやねん的に感じる.
text replacementのところに登録しておくと,ちょっと便利.使うことなさそうだけど.
Uniprotで調べた標的タンパクのSummaryとPDBを取得する
Grüezi,
Biopythonのライブラリを使ってUniprotをいじってみたので,以下覚書.
# ライブラリのimport
import pandas as pd
from Bio import SeqIO
from Bio.PDB import PDBList as pdbl
from urllib.request import urlopen
# 調べたいタンパクのUniprotKB accession numberのリスト(一つでもOK)
keys = [
    'Q96SW2',
    'Q68DV7'
]
# 空のDataFrameを作成
summary = pd.DataFrame(index = keys, columns = ['name', 'description', 'pathway', 'tissue', 'subcellularlocation', 'function', 'PDB count', 'PDB'])
# Uniprotにアクセスしてtableを作成
for keyword in keys:
    handle = urlopen("http://www.uniprot.org/uniprot/" + keyword + ".xml")
    record = SeqIO.read(handle, "uniprot-xml")
    dbx = record.dbxrefs
    dfIO = pd.DataFrame(dbx)
    df = dfIO[0].str.split(':', expand=True)
    df.columns = ['name', 'id', 'and']
    dfPDB = df[df['name']=='PDB']
    PDBs = list(dfPDB['id'])
    summary['name'][keyword] = record.name
    summary['description'][keyword] = record.description
    summary['pathway'][keyword] = ''.join(record.annotations['comment_pathway'])
    summary['tissue'][keyword] = ''.join(record.annotations['comment_tissuespecificity'])
    summary['subcellularlocation'][keyword] = ', '.join(record.annotations['comment_subcellularlocation_location'])
    summary['function'][keyword] = ''.join(record.annotations['comment_function'])
    summary['PDB count'][keyword] = str(len(PDBs))
    summary['PDB'][keyword] = ', '.join(PDBs)
summary.T
# タンパク名のDirectoryを作成してPDBをDL
for pdb_id in PDBs:
        pdbl().retrieve_pdb_file(pdb_id, pdir=record.description)
print('fertig')
こんな感じのDataFrameが出力されればOKです.
 以下,要所だけ説明.
# keywordのxmlにアクセス
handle = urlopen("http://www.uniprot.org/uniprot/" + keyword + ".xml")
# recordの作成
record = SeqIO.read(handle, "uniprot-xml")
print(record)
XMLはタグ付きの情報なわけですが,Uniprotのxmlは私のような素人にはちょっと複雑です.
Biopythonを使うと,dic形式っぽいrecordを作成出来ます,が...
 ooops...みたいになります.
情報量が多くて絶望しそうになりますが,XMLなので情報がタグ付けされてます.
ざっくり言うと,[ID, name, Description, Database cross-references, annotation, sequence]みたいな構成になっています.
ここからBiopythonのinstanceで目的にあった情報を抽出してこれます.
record.と入力した後にtabを押すといい感じに候補が出てきます.,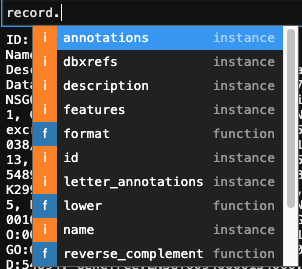
例えばidなんかは比較的シンプルで,
record.id
# 'Q68DV7'
みたいに返ってきますが,Database cross-referencesとannotationは,ややむずです.
record.annotations
ではannotationがdictionaryで返ってきます.

つまり,keyでslicingしてやればvalueが返ってきます.
例えば,
record.annotations['comment_PTM']
# ['Autoubiquitinated.']
みたいにリストで返ってきます.
こいつ自己Ub化されるんか.
record.dbxrefs
でDatabase cross-referencesのリストが返ってきます.
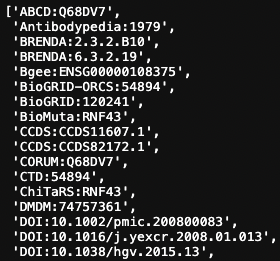
使いづらw
ここで欲しい情報だけとってくるのにひと工夫必要でした.
# Database cross-referencesのDataFrame作成
dbx = record.dbxrefs
dfIO = pd.DataFrame(dbx)
# ':' でstringを分割
df = dfIO[0].str.split(':', expand=True)
# カラム名の割り当て
df.columns = ['name', 'id', 'and']
# 'PDB'を含むrowをfilter
dfPDB = df[df['name']=='PDB']
# PDB IDをリストに変換
PDBs = list(dfPDB['id'])
PDBs
# ['4KNG']
私が欲しいのはPDB IDのリストなんで上の処理ですが,DOIやPubMed IDでも同じことがもちろん出来ます.
Database cross-referencesもannotationみたいに最初からdictionaryでくれれば苦労が少ない気が...
さてさて,以上の内容をfor文で回してあげたのが冒頭のスクリプトで,複数のタンパクのsummaryをUniprotからDataFrameへと出力出来ます.
ちなみに今回例にしたRNF43ですが,先日PROTACの報告がありました.
膜局在型E3Ligaseなんてものがあるらしく,標的とRNF43をバイスペ抗体で近づけてやるとpolyUb63化されてLysosomeで分解されるんだとか.
「節子,それPROTACちゃう,LYTACや」
ってツッコミはなかったのかなーとか思ったり.
ちなみに本当はlxmlというライブラリを使った方が色々情報取れるはずなんですが,それは勉強中なので宿題ということで. seiyakukenkyusya.com
それではBis Wald, tschüß.
素人がM1のMacでも自己満するTerminal Prompt設定
*この記事は過去の記事をベースにマークダウン記法の練習に作成してます.
keetaneblog.hatenablog.com
マークダウンについてはチートシートを見ながら書いてます.
Qiita マークダウン記法 一覧表・チートシート - Qiita
最終的な見た目はこんな感じになります.
 軽く説明すると,
- 1行目にDirectory path (+ あればGit Branch),2行目に$
- Git add前はブランチ名が赤に,commit 前だと黄色になる.
- anacondaの仮想環境に入ってると先頭に表示(anacondaの デフォ)
つまりこんな感じ.
(env) ~/Document/Directory [branch]
$ コマンド
Gitのbranchとstatusを表示する
こちらのリンクの内容のほぼまんまコピペです. 1箇所コピペするだけでgitブランチ名を常に表示【.zshrc】
下記のscriptを~/.zshrcにコピペして保存します.
# git ブランチ名を色付きで表示させるメソッド
function rprompt-git-current-branch {
  local branch_name st branch_status

  if [ ! -e  ".git" ]; then
    # git 管理されていないディレクトリは何も返さない
    return
  fi
  branch_name=`git rev-parse --abbrev-ref HEAD 2> /dev/null`
  st=`git status 2> /dev/null`
  if [[ -n `echo "$st" | grep "^nothing to"` ]]; then
    # 全て commit されてクリーンな状態
    branch_status="%F{green}"
  elif [[ -n `echo "$st" | grep "^Untracked files"` ]]; then
    # git 管理されていないファイルがある状態
    branch_status="%F{red}?"
  elif [[ -n `echo "$st" | grep "^Changes not staged for commit"` ]]; then
    # git add されていないファイルがある状態
    branch_status="%F{red}+"
  elif [[ -n `echo "$st" | grep "^Changes to be committed"` ]]; then
    # git commit されていないファイルがある状態
    branch_status="%F{yellow}!"
  elif [[ -n `echo "$st" | grep "^rebase in progress"` ]]; then
    # コンフリクトが起こった状態
    echo "%F{red}!(no branch)"
    return
  else
    # 上記以外の状態の場合
    branch_status="%F{blue}"
  fi
  # ブランチ名を色付きで表示する
  echo "${branch_status}[$branch_name]"
}

# プロンプトが表示されるたびにプロンプト文字列を評価、置換する
setopt prompt_subst

# プロンプトの右側にメソッドの結果を表示させる
PROMPT='%F{green}%~ `rprompt-git-current-branch`
$ %f'
違うのは最後の2行だけです.
これでBranchの表示も左に寄せてます.
既に使用中のterminalに反映したい時は,下記コマンドを実行します.
$ source ~/.zshrc
Zshの表示部分をDirectory Path + Git branch + $に変更する
こちらを参考にプロンプトの表示結果だけを変えました.
具体的には,こんな感じです.(before >>> after)
before
RPROMPT='`rprompt-git-current-branch`'
>>>
after
PROMPT='%F{green}%~ `rprompt-git-current-branch`
$ %f'
RPROMPTはプロンプトの右側に表示する内容なので,左側のPROMPTに変更しました.
先頭はDirectory Pathになるように%~,続いて`rprompt-git-current-branch`の後に改行する.
改行はマストではないけど,コマンド自体は$の後に新しい行に書く方が視認性が高いと感じます.
Macを新調してからTerminalの表示がうざいなぁと思ってたから,スッキリ整理できてよかったー.